Friday, 31 January 2014

A quilt down memory lane...

I am amazingly sentimental person. This, unfortunately, has many, many draw backs. The main of these is the fact that I do have a tendency to hoard anything that has anything and everything as I cannot bear to throw anything away. Over the years I have got better as my husband is the complete opposite and with the arrival of our little girl it has made room a little restricted.

The biggest thing I found difficult throwing away was a box of old t shirts. I haven't worn t shirt properly since I was about 11 it over many, many years I seemed to have accumulated loads of them from productions I've worked on and west end shows I had been to see plus my London marathon shirt (a feat I still can't quite believe I completed) and a few other random ones from my university years. It seemed a pity to throw so many memories away so I came up with the idea of making a quilt out of them.

I had never made a quilt before so I tried to base it on first principles. I cut out the bits of the t shirt I wanted and then lay it on my living room floor ... It took up most of it. I pinned together the pieces roughly and then measured how much material I would need for the backing... And I needed quite a bit!

Something I love it to is go around charity shops. As part of my day job I usually have to have a good root around for props and stuff for productions so charity shops are one of my favourite places - and you are giving something back which is always nice to do too.

I found a beige flat sheet in a charity shop and thought it would make a good back panel for my quilt. I also bought a couple of metres of bias binding to neaten the edges at the end. (As you have probably gathered from my previous posts I have discovered that bias binding helps with so much ... Give it a go!)

After pinning the pieces together I sewed together a row followed by another row until I had roughly five rows of t shirt pieces. The biggest challenge though was that I hadn't kept the pieces uniform which made keeping the rows together quite difficult! If I attempted this again I would keep the pieces uniform in size and length!

When I had the rows I started sewing the rows together until I had the whole thing.

What I hadn't planned for was the fact that t shirt material is quite stretchy so left a few gaps in the finished panel so I found some off cuts of some fabric I liked and filled the gaps with it.

I then pinned the back panel to the front panel and then pinned bias binding around the edge. I then sewed two lines of stitching around the edge to bind the panels together.
Simple as that!
This was an ambitious project. I think next time I will do something a little more simple!

Shark attack!

With valentines day looming and everything related to valentines being pink, full of hearts and cutesy stuff my husband dreads the day. He hates that kind of stuff. Every year I struggle to find him something which has the right sentiment but doesn't come across as too sickly sweet.

This year I decided to make my own present for him. A pair of shark slippers.

My husband is animal crazy... But also loves things that are unique and quirky ... And he bashes slippers to pieces so is in constant need of a new pair or two so shark slippers seemed a good thing to do!

My husband has size 12 feet so I bought the slipper bases on the Internet (link below). I also bought foam for the shark shapes.

I drew out a template and cut out the shapes and pinned them in place. I then sewed the two side pieces to the slippers by hand.

Before sewing on the head pieces I stuck on triangles for the teeth. After leaving it to dry I then sewed the head piece to the top.

I found some googley eyes in my craft boxes and stuck them on.

I now await what my husband thinks ... I hope he likes this alternative valentines gift!


Collared...

The biggest problem I have found  after giving birth (other than the distinct lack of sleep) is the fact that I still can't quite fit into my pre pregnancy clothes so still can be found wearing elasticated waistbands and maternity clothes.

To be fair I loved my dresses and have been slowly adapting then so they look less like tents and more like something I can wear to work.

I miss a lot of fashion fads but love the sales after them as it is usually where I can pick up some great bargains! I never quite got the idea of wearing a collar necklace but when I found one in a sale I knew it would be perfect to make my dress more dressy.

I took off the necklace fastenings (with a nifty pair of pliers) and then pinned the collar to the dress with lace pins (they leave next to no hole in the fabric when used!) the thread of choice was invisible thread which blends nicely into whatever you are sewing but also can be a little like sewing with fishing wire. I was sewing by hand - I have no experience of using the stuff with a sewing machine so have no idea what it is like.

The hand sewing took hardly any time at all - a quick and simple way to update a dress!

When's a door not a door?

I have always found Easter one of the hardest holidays to prepare for. It usually falls just when my students are preparing for many many exams and I end up panic buying Easter eggs from the supermarket and none of creative juices are given the chance to flow!

So this year while on maternity leave I thought I would start early and thought I could use up my surplus collection of jars which seemed to be over taking the shed.  I started by buying mini eggs of different brands as my family have very individual tastes when it comes to their favourite egg. I also added a small Lindt bunny for everyone except my husband (he doesn't do posh chocolate!)

I cut out a circle of fabric from my huge stash of scraps and then wrapped silver thread to secure the fabric over the lid. The chick was then glued to the top.

Really simple but nicely effective.

Next year I hope to be as organised as this one!

Quick note: For all of my sewing projects I use gutermann threads. Personally, I have found this the most trustworthy brand and it always comes in an amazing array of colours.


It's the little things...

Sometimes crafting inspiration can strike when you are least expecting it...

During the Olympics I felt a lot of patriotic pride - something I had never really experienced before. But both me and my husband attended London 2012 and it made us proud to be British.

I made a few of these little brooches to celebrate and still wear one on my coat during high days and holidays...

They can also be found in my etsy shop - check it out!

Etsy shop - Union Jack heart brooch

Pull yourself together...

Most people when they go through the 'nesting' stage of pregnancy start cleaning out cupboards, painting skirting boards or just generally blitz their homes.
I made curtains.

 In the weeks leading up to my daughters birth I set about making two lots of curtains - one set for my baby-to-be and the second for our dining room. (I am going to add that our dining room leads to a conservatory so doesn't really need curtains... But as my husband learnt - never argue with a pregnant woman!) As these were replacing existing curtains which were already up when we moved in three years ago I used them as a pattern for the new ones. I pinned the material to the existing curtains to get the length and hung them up to make sure I was hanging it straight. The same was then done with the lining which was blackout material for the baby's room and just a cheap cotton lining for the dining room. In the baby's room the blackout material was quite easy to work with (although I needed to adjust the setting on my sewing machine so that the extra thickness didn't jam it).

 For the hanging loops I unpicked one of the existing ones to check for size. I cut out the desired amount (remembering a seam allowance), pressed and then sewed. The loops were attached to the top of the curtains between the main fabric and the blackout material to make it look a bit neater.

 In the dining room it was not quite as straightforward. The material that I had bought was not quite long enough for the proposed windows so I decided to lengthen them with a strip of black material attached to the bottom and use the same black material to make the curtain loops. The bottom piece was measured umpteen times as I wanted it to be straight and to look good. It was a tense moment after sewing everything on and hang inning the curtains for a final time ... But ultimately it was a success. As I had some of the main fabric left so made a couple of curtain ties using an existing one as a template and used bias binding to tidy up the edges plus a curtain ring as the finishing touch.

 Thankfully the curtains were finished in plenty of time for my daughters arrival - I doubt I would have had the patience after she had been born!


An obsession with history and chickens...

Creativity doesn't stop with me in my house. My husband is also an amazing crafter and a very talented cross stitcher.

During a spell of unemployment (due to us moving up north because of my job) my husband started to get cabin fever in a big way so needed a project to concentrate his mind. My grandfather was a whizz at cross stitching so I suggested to my husband that maybe he should try it.

After being a little reticent he completed a starter pack in minutes and progressing through every small project given to him he needed a huge challenge.

One of our local haberdashers is a place called The Viking Loom in York. It sells crafting bits and pieces for every hobby but also has an amazing array of cross stitch projects. One that they displayed in their window was that of the Kings and Queens of England (designed by Bothy Threads) and we knew this was what my husband should tackle next.

Over the following months we planned our wedding, prepared for a gruelling house move and my husband also started a temporary job in a school teaching biology. He also set a target to finish the project before our wedding... And by golly! He did.
It now sits with pride on our bedroom wall and is used as a reminder that perseverance  pays off.

After the success of the Kings and Queens he completed a few small projects and also decorated our newly purchased house (as I do not enjoy painting walls!)

Early last year I found out I was expecting our first child and this prompted a flurry of activity and the completion of many projects before the impending arrival. And my husband started a cross stitch to keep his mind focused of an evening and it meant that he could hide away with it when I had any hormonal strops!

This project was another by Bothy Threads called Hen Fun. I love chickens and my dream is to, one day, have my own chickens that lay eggs that I can then turn into cake. At the moment it is not going to be possible but the dream is still there. So my husband was doing this one for me.

It was so sweet to see him taking absolute pleasure in making each chicken and even naming each one after a member of our household (including the pets!).

It took him just over 2 months to complete as well as him doing a full time university course (a decision that has made him happier than ever).

The finished piece now hangs in our daughters bedroom and one day will hang in my office (when I have one!) I love seeing it. It reflects his love.

His next project is for our daughter ... I will post again when he finishes it!


http://www.vikingloom.co.uk

Thursday, 30 January 2014

The life, the universe and everything...

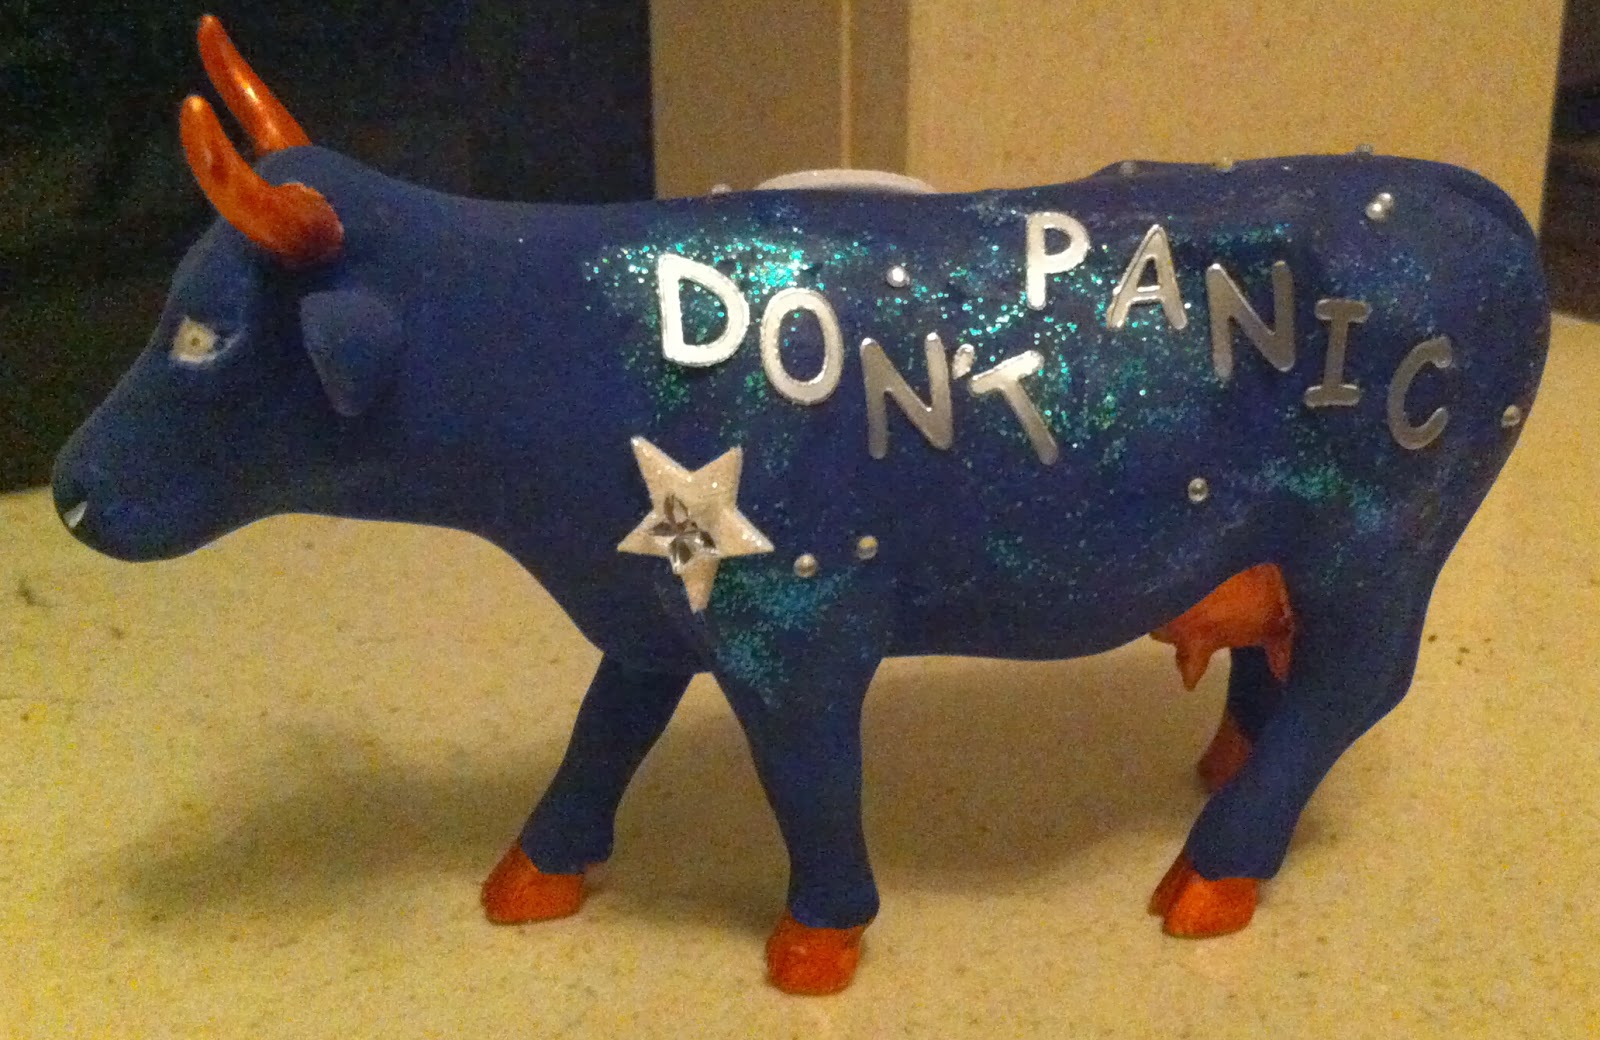
Many Christmases ago my Dads then girlfriend gave me a paint your own Cow Parade Cow. Up until recently I had ignored it and it moved from house to house with me not because I didn't like the gift but because I had in idea what to paint on it. My biggest problem is that I didn't want to make a hash of it. I wanted something that could sit on a shelf and I could say 'I did that' and it also had to pass the 'husband test' of him not saying 'that's-nice-dear-maybe-it-can-go-in-your-office(-so-I-can't-see-it!)

I love the work of Douglas Adams. There isn't a single thing of his that I have not listened to, read or watched. My favourite pastime is listening to 'The Hitch Hikers Guide To The Galaxy' radio series generally last thing at night as I find it funny and strangely soothing. And it was from this I drew my inspiration!

After deciding on an initial idea I then drew out a plan on a back of an envelope (I really wish I was exaggerating but it was the only thing I had to hand!) I can't draw to save my life but at least I knew what I wanted and needed the next time I popped to my local craft store!

Going around said craft store is an immense pleasure of mine which is about on a par with browsing around a bookshop for me. There is something calming about those places and therefore makes me calm too. I bought my supplies (perhaps a few more than needed) and was ready to start!

The cow itself got painted in navy blue acrylic paint, highlighted with a copper acrylic paint on hooves and horns. I then stuck on my letters, numbers and stars firmly using super glue (I wasn't sure how the adhesive would stand up to being stuck on a curved surface). I also slathered the cows main body in iridescent glitter glue to give it a nice sheen but also to look a little like smaller stars.

It was left to dry.

I had decided to pay homage to the character of Arthur Dent, the human caught up in the adventures across the galaxy who spends most of the book wearing his dressing gown. I had to make a draft of this as I wasn't quite sure how a dressing gown on a cow was going to quite fit! Once the draft was roughly fitted I could start on the real thing - making a collar, belt loops and two pockets - which were all hand sewn as it was too delicate to go through the sewing machine. The belt was then threaded through the belt loops and tied on to the cow!

I was pleased with the result and it now sits on a shelf above the tv (a sure sign that my husband approves too!)


Wednesday, 29 January 2014

Family matters...

I live a good 200 miles from my sister and parents but I would like to say that I have a good relationship with them.

The whole 'I enjoy sewing' thing has certainly got its advantages from my family's stand point it means that I will quite willingly adjust and hem various items of clothing.

My sister embraces most fashion trends and had bought a onesie during the January sales. The problem was that it had feet and whenever she wore it (and ignored the constant ribbing from her now fiancé) the feet flopped around like a pair of flippers. So she asked whether I could remove the feet and put in some elastic at the bottom.

This seemed like a straight forward request until I realised that the seam at the bottom of the leg was not straight. A lot of puffing and sighing then ensued as I painstakingly unpicked the legs and the feet.

My sister helpfully sent me her ankle measurement so I could tailor the bottom of the leg properly. I pinned it to the desired length, trimmed any excess fabric and then used a contrasting thread to sew it in place (she had requested this!) leaving a gap to feed the elastic through.

I then fed the elastic through the tube using a safety pin. I have found that a big safety pin is the easiest thing to use as I find this quite a fiddly job and it usually takes me a couple of goes to get it right!

Once the ends meet sew them together and close up the gap.

Easy peasy!

Note: no photos of the onesie ... My sister says she would throttle me ... Sisterly love, eh!

Tuesday, 28 January 2014

My Starter for Ten

One of my day jobs is as a Lamda speech and drama teacher. As a former lamda speech and drama student myself I had always aspired to become a teacher of it myself.

One of the many joys of the job is getting to read. Lots. I am constantly on the look out for new literature, plays and poems for my students to test and tackle. My mum reads a lot to so there is a constant stream of books that how backwards and forwards between us.

I ended up reading 'Starter for Ten' by David Nicholls because of my mum. She said it would be a light read after giving birth! I had only just forgiven my mum for giving me 'One Day' to read - I was so devastated that it lived in the fridge for 48 hours (a strange tradition of mine which happens to all books that either upset or frighten me!)

David Nicholls is incredibly talented. Not only has he written novels but has turned tow of his novels into films. He has also written many things for television (including episodes of Cold Feet).

Starter for Ten (set in the 1980s) centres around an obsessive university teenager, Brian, who wishes to become part of a team on University Challenge. The story tells of his loves, friendships and sometimes quite bizarre adventures which he encounters to get there. At times the story is almost cringe worthy as Brian stumbles through trying to function as a normal as humanly possible - and failing to some extents! The novel is funny and witty and has an unexpected conclusion.

I have 'The Understudy' on my shelf still to read. Maybe it should be next on my list?

http://www.davidnichollswriter.com


Fascinating Feathers...


I love a wedding. Unfortunately I haven't been invited to many because I was the first of my friends and family to tie the knot. However, a couple of years ago me and my husband were invited to a black tie wedding down in Bath (a five and a half hour drive with a bit of time added on to check why my car was drinking oil - if you can picture a couple in a tux and long evening dress under the bonnet of a car on the M4 then you get it!)

Anyway, as it was black tie I didn't want to wear an embarrassingly big hat but instead opted for a fascinator to compliment my long red silk dress. However, to find a delicate fascinator in the colours I required (and that didn't cost a small fortune) was quite a feat. So I decided to make one.

I knew I wanted a flower and some feathers in either black or silver. So I headed to Claire's accessories. I turn 30 in a couple of weeks but will still be found in this tween-angers dream shop racking through the sale items. Usually then to dismantle them a couple of hours later and turning them into something else. I love it... Even if it is embarrassing to admit it!

I ended up buying a small silver rose with a clasp on the back and a couple of pairs of feather earrings.

I used the rose as my base. I dismantled the earrings (I loved the spotted feathers) and arranged the feathers behind it. I glued them in place using super glue. CAUTION: when using super glue watch your fingers but also be careful to hide where you have glued as it can leave a white residue when dry!

I also dismantled an old hairband that I wore to another wedding (and had been dubious about my choice ever since) but I loved the butterflies on it so took them all off. I placed one on the feathers at an angle and then glued it in place.

I then left it to dry for 24 hours.

I was pleased with the final result and wore it to the wedding as planned. And got lots of compliments. So in future I plan to make my millinery wear... And see what I come up with next!

Claire's: http://www.claires.co.uk


>

Making the apron strings...

I sometimes find when I am out shopping that there is some amazing fabric out there but it comes with a hefty price tag. But on the other side of it there are some beautiful tee towels out there tat are crying out for a new use other than drying the dishes!

Purple is my favourite colour so when I picked up a pack of tee towels a couple of years ago with different hues of purple I knew that I simply had to make a half apron out of them.

The only extras that I needed for this project was a length of bias binding and something to make the ties. These particular ties are off a bridesmaid dress that was adapted for my wedding a couple of years. I kept the off cuts for a rainy day. A thick length of ribbon would also suffice.

I cut the tee towel in half. I put the half I wanted to keep to one side. With the other half I cut it into half again. This would act as the pocket of the apron.

Around the sides of the pocket and the main part of the apron sew around the bias binding. The bias binding works better if it is pressed in half first as it feeds through the sewing machine better. This can also be done by hand if you prefer!

Then sew the pocket with whip stitch to the main apron.

The attach the apron strings to the back. I used a simple running stitch but it might be better to sew it with your machine. (I didn't as my machine was having an off day and refused to take the fabric!)

And there you have it!

This pattern can be adapted and changed to purpose. I use the apron when I am crafting and need a lot

of little things at the same time. I have also used it at school during school productions for the normal paraphernalia that is needed there too.


This project does not cost a fortune ... Give it a go!


A bunting we will go!

When I first got my sewing machine I was desperate to make something that was quick, easy and simple ... Plus it needed to be something that I could not muck up in any way. So I decided I needed to make some bunting.

As I have previously mentioned I am a massive bookworm and I feel that books solve most problems so I bought a book on how to make bunting.

In hindsight I realise that I possibly didn't need a book but it seemed a great idea at the time. Some of the more complicated ones look great though!

I had a fat quarter of some cake fabric which I bought from ebay, a metre of bias binding (readily available from hobbycraft or any other haberdashery) and a triangle template.

I made the template slightly bigger than the bunting I wanted to finish up with (allowing for seams). I drew out 12 triangles and cut them out. I sewed around the two longest edges. I then turned them inside out. I then pressed them.

It has only been since I started sewing that I have realised how useful having a small travel iron to hand. There always seem to be seams to press and you don't want to be getting out your massive laundry one every time as pressing can take seconds. The one I use is linked at the bottom.  If I had my own way and had a craft room I would have an ironing board and iron always out -I will have to continue dreaming!

After pressing lay out the triangles in the order you want them. Take your bias binding. Press it in
half (which can be tricky so watch your fingers!) the place the triangles between the two folds if the binding and pin in place.

Then run the bunting through your sewing machine making sure the triangles are square inside the binding.

And viola! Your bunting!

I want to experiment with some other types soon so I'll let you know how it goes!

Travel iron: http://www.argos.co.uk/static/Product/partNumber/4103336.htm
Etsy shop: https://www.etsy.com/uk/listing/177390311/cupcake-bunting


https://www.etsy.com/uk/listing/177390311/cupcake-bunting

A little bit of love...

My sister recently got engaged after many years of dropping less than subtle hints to her then boyfriend. I am genuinely delighted for her as I know she will enjoy the whole wedding planning thing - especially the trying in of wedding dresses as she has been dreaming of a wedding for at least the last ten years when our mum got remarried and she hoarded my mothers discarded wedding magazines for months afterwards!

I wanted to give them something that was unique for an engagement present that they would be able to put on a shelf in their new flat (which they hope will materialise in the coming months).

I have spent quite a few months experimenting with decoupage and papier mâché letters that you can get. I love letters that spell out words in a house (though I have been banned from having any of these in our house) so I give them to other people.

This particular set of letters came from hobbycraft and was boxed (but could be purchased separately).http://www.hobbycraft.co.uk/hobbies/papier-mache/mache-letters-and-numbers

I gave them two coats of red acrylic paint. The papier mâché absorbs a bit of the paint and needs quite a thick layer so the brown doesn't show through. The next problem is how you leave them to dry. My advice is place them on a tiled surface that won't stain... I left mine on newspaper so had to go over the places where the newspaper had transferred on to the letters.

To give the letters a bit of a nice finish I lavishly brushed on some Mod Podge   which comes in all types of sheen such as Matt, gloss and shimmer. It is inexpensive for the amount of crafts it enhances and it especially great for sealing and for decoupage.
  I then left the letters to dry for 24 hours.
I am an impatient soul at times so this is probably the hardest bit for me!

When it is fully dry apply your sequin hearts. Mine came from pound land I think and around this time of year glitter hearts are ten a penny with it nearly being Valentine's day. I stuck the sequins on with super glue. Other glues would probably be suitable but I don't like to leave anything to chance.

Again leave everything to dry and hey presto! A 'Love' sign. An exciting and creative present or
valentines gift if you wish.

Please let me know if you try this. I will let you know if my sister likes it. Fingers crossed, she 
will!

Mod Podge link: http://www.hobbycraft.co.uk/plaid-mod-podge-matte-8floz-236ml/569311-1001


Monday, 27 January 2014

Just to start... A secret from Loch Ness

I love sewing...

If I could find a way to sew and earn a good living and also get to do my drama teaching and have time to read and spend a bit of time with my family and friends I would.

Unfortunately the boring bits of life get in the way and my ideas box is overflowing with pages torn out of various craft magazines - many of which will lay dormant for many years to come.

When I first bought my sewing machine (with money from my 27th birthday) it was exciting and a moment of epiphany for me. I could create clothes and homewares all by myself. I felt enlightened.

My mother was possibly the most surprised by my revelation as she had always claimed that sewing was not something she did other than the odd button or name tag when I was young. My great grandfather designed and sewed costumes for the Atila girls appreantly. One day I will follow up this fact as it would certainly mean that sewing and being creative is truly in my blood.

My mother gave me a set of patterns that her Nanny had given to her before she died. They are called 'Silver Needles' and were published in the 1970s. The collection includes children's, men's and women's clothes, home sewing projects and a stack of crochet and knitting projects too. If anyone can give me any more information I would be very grateful.

The first project I tried was a felt Loch Ness Monster. As a kid I loved tales of the unexplained and it seemed a quick project that could while away a couple of hours of an evening. As it was made of felt the fabric was not going to fray. I also didn't have any proper stuffing so used polystrene balls instead to stuff him.

Here is the finished result:


I was pleased. So pleased that I put him on sale on etsy www.etsy.com but as to this day no one has bought him so he spends his day in our bedroom on another bookcase! 

If you are interested in buying one please check out my etsy shop... I will custom make one for you as I don't think I could bare to part with the original. If you want the pattern or want me to post it just let me know. 

A bit of mystery in York...

As I previously said I wanted write a bit about the books that I read.

I have an eclectic mix of books and have a massive wall to wall, floor to ceiling bookcases in my dining room. Books are certainly my biggest vice (other than hoarding stuff which 'could be great for crafting'!)

The book I have just finished was called 'The guilt of innocents' by Candace Robb which was part of her Owen Archer series of books. I didn't realise there was a whole series of them until I wanted to know the back story of the protagonist, Owen Archer.

The book is set in my current city, York in 1372, and I am always keen to see how true to life the city is depicted in fiction. Robb has done this well and uses a lot of key details that the well-versed local would know to be true such as the original site of St Peters School and where barge men used to gather at that time.

The book is fast paced and full of intrigue which is reminiscent of reading a novel by Ellis Peters. If you enjoy a Medieval Murder Mystery then this is the book for you. However, I would recommend that you start somewhere other than the ninth book in the series (which this one is!) if you like to know the background of your characters and need to know why Owen Archer only has one eye!

If you are interested this book can be purchased on amazon here: http://www.amazon.co.uk/Guilt-Innocents-Owen-Archer-Mysteries/dp/0099497891/ref=tmm_pap_title_0?ie=UTF8&qid=1390854471&sr=8-9
Let me know if you enjoy it!


A bit about me...

I spend a lot of time making stuff. My brain is constantly thinking if things to make, do and mend. The problem is that I don't always get the opportunity to do this.

Five months ago my life changed forever in the form of a chubby ball of smiles and cries called Sophia. It changed for the better and has made me more aware of others and how crazy it is that anyone has survived being a parent with so little sleep! Despite all this I love being a parent. I also love being a wife. I also love my job.

I have been married since 2011. My husband is also a crafty type (although he would claim it is mostly 'scientific stuff' that he creates. I beg to differ.

I work as a drama teacher but also create props and costumes for productions hence the reason why some  times my work and home life seem to coldie more often than not.

So, why start a blog?

Well, for the things are created in our home. But also for somewhere to ponder. I want to post tutorials but also give inspiration to others. The crafts will be varied although my favourite pastime is being sat at my sewing machine...

I might also include a few book reviews ... I am a massive bookworm too ...

Other likes include an unhealthy obsession with rubber ducks and chickens... But I promise not to go on about those!

Sewing crafts, books and a young baby - what could possibly be wrong with that!